Ingredients
Scale
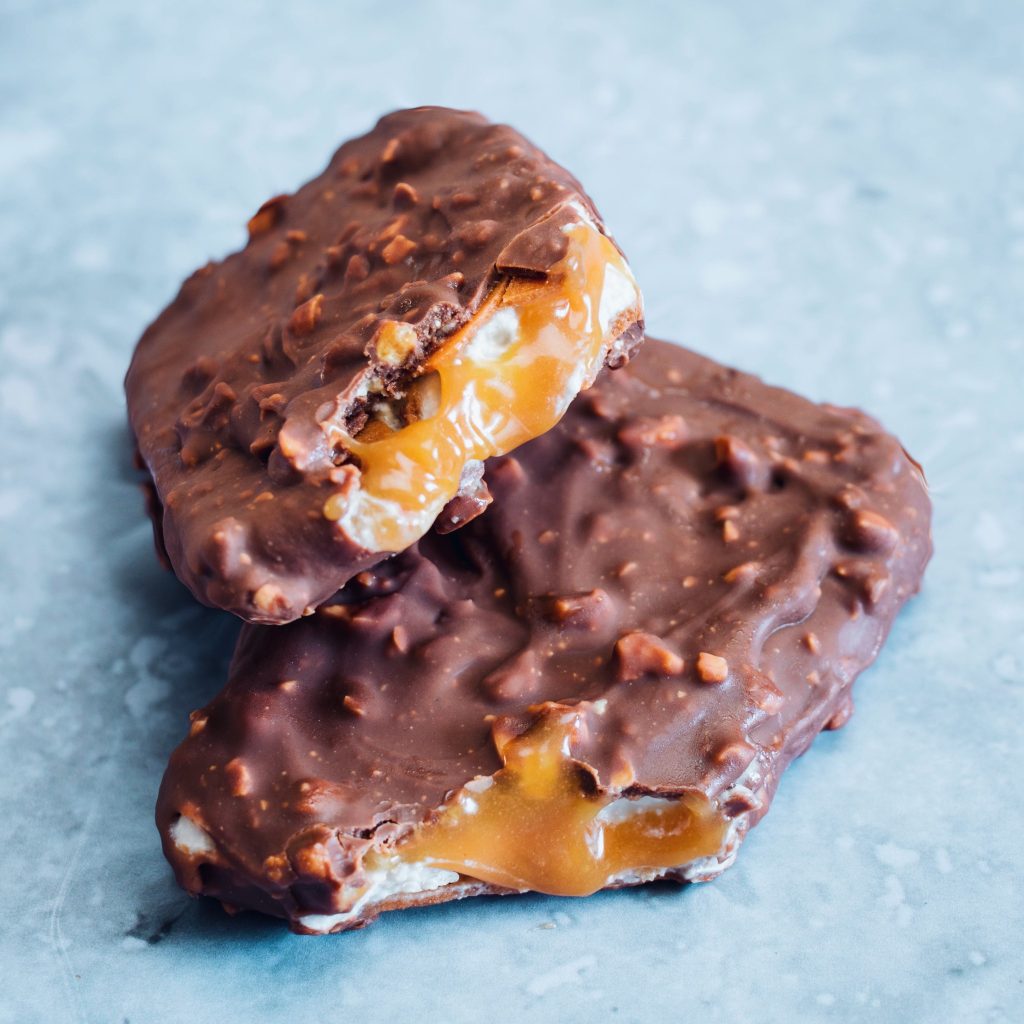
- Crispy Wafer:
- either store-bought vegan wafers
- or make yourself:
- 1/4 cup brown rice flour
- 4 Tbsp cornstarch
- 1/8 cup vegetable oil (I used sunflower)
- 1/8 cup liquid sweetener (agave or maple)
- 3–4 Tbsp plant milk
- Cream Filling:
- 2 15oz cans coconut cream, chilled overnight (only the firm part – about 1.5 cups)
- 1 tsp vanilla extract (or powder)
- 2 Tbsp maple syrup
- Caramel:
- 1/3 cup almond butter
- 1/4 cup maple syrup
- 1 Tbsp coconut cream
- 1 tsp vanilla extract
- Coating:
- 160g iChoc Super Nut
- 1 Tbsp coconut oil
Instructions
- Start by making the wafers. In a small bowl combine all ingredients and combine with a whisk until you have a smooth batter. You want the batter too be pourable but not too liquid (check video).
- Preheat oven to 300°F (150°C) and line a baking sheet with parchment/silicone paper. Pour half of the batter on the sheet. Keep in mind the size of the baking dish you’ll use to assemble the ingredients (I’ve used a 18cm x 25cm (7×10″) baking dish). Start tilting the baking sheet back, forth and to the sides to spread the batter evenly. Once you have a surface as big as the bottom of your baking dish place in the oven and bake for 5 minutes (until the surface has barely hardened), then take out. Use a knife to gently cut the shape of your baking tin into the batter (you should also quarter the wafer batter already because it’ll be hard to cut it without breaking once crispy). Place back into the oven and bake for another 5 minutes until golden brown, then remove excess wafer pieces and let cool down. Repeat this step with the second half of the batter.
- For the cream, simply use a hand mixer to combine all ingredients in a medium size bowl. Place in the fridge until needed.
- Line your baking dish with cling film or parchment paper for easier removal later. Place the first wafer layer in the bottom. Take half of the cream and spread evenly on top. Place in the freezer while you prepare the caramel.
- In a small bowl, whisk together all caramel ingredients until you get a thick mixture. Use a spoon to divide the caramel into two long rectangles on top of the cream and place into the freezer for 60 minutes.
- Once hardened, spread the remaining cream evenly on top and add the second wafer layer. Gently press down a bit to remove excess air. Place back into the freezer for 2 hours, then remove from the baking dish and gently cut into 4 rectangular pieces (lengthwise along caramel lines). Place back into the freezer while you melt your chocolate.
- Coat each bar with the melted chocolate, place on parchment paper and return to the freezer. After 30 minutes you can transfer the bars to the fridge for a smoother inside or keep them in the freezer for a more ice-cream like consistency.
Description
As in all of my recipes, 1 cup equals 250 ml. I used a 18cm x 25cm baking dish (7×10″).